Van Conversion Electrical Tools (2026)
- Feb 16, 2026
Essential electrical tools for your DIY camper van build. Learn what tools you need to safely install batteries, solar panels, inverters, and wiring systems.
Table of Contents
Affiliate Disclosure: This website may contain affiliate links. The creator of this website may earn a commission from qualifying purchases made through these links at no additional cost to you.
Van Conversion Electrical Tools (2026)
Installing an electrical system in your DIY camper van is one of the most empowering — and intimidating — parts of a van build. But what tools are required for a van build electrical system installation process to wire up your own battery bank, solar panels, solar charge controller, inverter, battery charger, and van appliances?
Many first-time builders worry they need a professional workshop full of specialty tools to build a safe, reliable van electrical system. In reality, most van electrical installs rely on a small set of well-chosen tools, used repeatedly throughout the build process. The key is understanding what each tool does, when you'll use it, and why quality matters for certain items more than others.
This guide is designed to remove that uncertainty.
By the end of this article, you'll understand which electrical tools are essential for a DIY van build. Whether you're wiring a simple weekend camper or a full-time off-grid rig, this guide will help you confidently plan your tool list before you start cutting wire.
How This Tool List For Your DIY Campervan Electrical Build Is Organized
Rather than listing tools randomly, this guide groups tools by function — the actual job they help you perform during a van electrical install. This mirrors how you'll use them in real life and makes it easier to identify what you need at each stage of your build.
1. Van Build Electrical System Measuring & Diagnostic Tools
Tools that help you understand what's happening electrically
These tools are essential for safety, verification, and troubleshooting. You'll use them during installation and long after your build is complete.
Digital Multimeter

Purpose: A digital multimeter is used to measure voltage, current, resistance, and continuity in an electrical system.
Why it matters in a van build: A multimeter is the most important diagnostic tool in a DIY van electrical build. It allows you to verify correct wiring, confirm battery and inverter voltages, test fuses, and troubleshoot electrical issues safely and accurately instead of guessing.
Benefits:
- Confirms proper voltage and polarity
- Tests continuity and identifies broken connections
- Assists with fuse and circuit diagnostics
- Essential for installation, testing, and long-term maintenance
Look for a multimeter with auto-ranging, continuity beep, and DC voltage measurement. You don't need a professional-grade meter.
I used the Klein Tools MM325 Multimeter, which I got in an Electrical Test Kit. It's a handy tool that I've used for so many projects beyond my campervan conversion.
Outlet Tester

Purpose: An outlet tester is used to verify that AC outlets are wired correctly by checking hot, neutral, and ground connections. It plugs directly into a standard 120V outlet and uses indicator lights to display common wiring conditions.
Why it matters in a van build: In a camper van, AC outlets are typically powered by an inverter or shore power connection. An outlet tester provides a fast, reliable way to confirm that outlets are wired safely before plugging in appliances. It helps catch common mistakes such as reversed polarity, missing grounds, or open neutrals — issues that can damage electronics or create shock hazards.
Benefits:
- Instantly confirms correct outlet wiring
- Identifies common wiring faults without tools or disassembly
- Improves safety when working with inverter or shore power circuits
- Ideal for final system checks and ongoing troubleshooting.
A basic three-light outlet tester is sufficient for most van builds. Models with a GFCI test button are especially useful if you're installing GFCI outlets, as they allow you to verify proper trip functionality with a single press.
I recommend the Klein Tools RT250 GFCI Outlet Tester
Non-Contact Voltage Tester

Purpose: A non-contact voltage tester is used to detect the presence of live AC voltage without touching exposed conductors or terminals.
Why it matters in a van build: When working with inverter or shore power circuits, it's critical to confirm that power is truly off before handling wires or outlets. A non-contact voltage tester provides a quick safety check and helps prevent accidental contact with live electrical components. Simply touch it to the outlet plugin to verify whether or not the outlet is energized. Get in the habit of testing this anytime you plan to work with outlet wiring.
Benefits:
- Quickly confirms whether a circuit is energized
- Reduces risk of electric shock
- Allows safe testing without disassembly
- Useful during both installation and troubleshooting
Choose a tester designed for standard 120V AC circuits with clear visual or audible indicators. While not a substitute for a multimeter, it's an excellent first-pass safety tool.
I picked up this Milwaukee Non-Contact Voltage Detector at my local hardware store.
2. Van Conversion Wire Cutting, Stripping & Preparation
Tools for working directly with electrical wire.
You'll use these constantly during rough-in and final wiring.
Wire Cutters

Purpose: Wire cutters are used to cleanly cut small wire gauges to length without crushing or deforming the conductors.
Why it matters in a van build: Clean, square cuts make stripping and crimping easier and more reliable. Frayed or smashed wire ends can lead to poor connections, increased resistance, and premature failure—especially in a vibration-prone environment like a camper van.
Benefits:
- Produces clean cuts for better stripping and crimping
- Preserves conductor integrity
- Speeds up wiring work
- Reduces rework and frustration during installation
Look for cutters rated for stranded copper wire. Avoid using pliers or multi-tools, which often crush the wire instead of cutting it cleanly.
Any simple wire cutter will work for these purposes. For the smallest wires you'll work with, your wire stripper will be adequate to cut your wires.
Wire Strippers

Purpose: Wire strippers are used to remove insulation from electrical wire without damaging the copper conductors inside.
Why it matters in a van build: Nicked or damaged conductors weaken electrical connections and increase resistance, which can lead to heat buildup and intermittent failures in a mobile environment. When you strip wires properly, you ensure clean, repeatable insulation removal, resulting in stronger crimps and more reliable wiring.
Benefits:
- Preserves conductor integrity for better crimps
- Improves electrical reliability and safety
- Speeds up repetitive wiring tasks
- Reduces frustration and rework during installation
Manual strippers work well if correctly sized, while self-adjusting strippers can save time on larger builds. Avoid using knives for stripping whenever possible, as they increase the risk of damaged conductors.
There are several options available on the market. However, with as few large gauge wires as a basic DIY van build requires, a standard utility knife will work fine for stripping large gauge wires.
Cable Cutter (Large Gauge Wire)

Purpose: Cable shears are designed to cleanly cut large-gauge stranded copper wire, such as battery and inverter cables.
Why it matters in a van build: Large-gauge wire (4 AWG–4/0 AWG) is difficult to cut with standard wire cutters and can easily become flattened or frayed. Cable shears produce a clean, square cut that preserves conductor shape, which is critical for proper lug crimping and low-resistance connections.
Benefits:
- Cleanly cuts thick, multi-strand copper cable
- Prevents deformation and frayed strands
- Improves crimp quality and connection reliability
- Reduces hand fatigue during heavy wiring work
Manual cable shears are sufficient for most DIY van builds. Look for hardened steel blades rated for fine-stranded copper rather than aluminum-only cutters.
I found the standard curved wire cutter in the bottom left of the photo to be extremely difficult to cut the largest gauge wires in my van build. For this reason, I recommend a ratchet style wire cutter or a long-handled wire cutter for better leverage.
3. Crimping Tools & Connection Tools
Tools that ensure safe, vibration-resistant connections.
Poor crimps are one of the most common causes of van electrical failures.
Ratcheting Crimpers (Small Gauge)

Purpose: Ratcheting crimpers are used to securely crimp insulated terminals and other connectors onto small-gauge electrical wire, typically ranging from 22–10 AWG.
Why it matters in a van build: Most van wiring—lighting, fans, pumps, USB outlets, and control circuits—relies on small-gauge wire. Consistent, high-quality crimps are critical in a vehicle that experiences constant vibration. Ratcheting crimpers apply uniform pressure and prevent under- or over-crimping, resulting in reliable connections.
Benefits:
- Produces consistent, vibration-resistant crimps
- Reduces failed connections and intermittent electrical issues
- Improves safety and system reliability
- Faster and more repeatable than pliers-style crimpers
Look for hydraulic crimping tool matched to the terminal types you plan to use (insulated, non-insulated, or ferrules). Even mid-range tools offer a major upgrade over basic crimpers.
These crimpers can be purchased inexpensively and you will use them a lot.
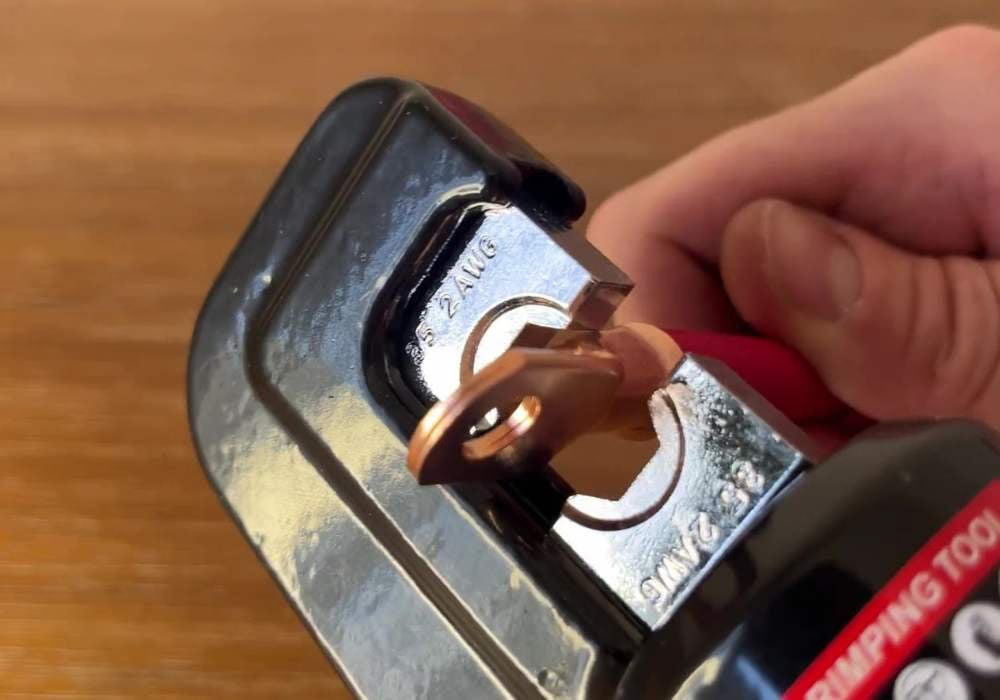
Heavy-Duty Lug Crimper

Purpose: A heavy-duty lug crimper is used to permanently attach large-gauge electrical lugs to high-current cables, such as battery, inverter, and bus bar connections.
Why it matters in a van build: Van electrical systems often carry significant current between batteries, inverters, and distribution points. Poorly crimped lugs can create resistance, heat buildup, and potential failure. A proper lug crimper ensures a mechanically solid, low-resistance connection that can withstand vibration and high loads.
Benefits:
- Produces strong, reliable crimps on large-gauge wire
- Reduces resistance and heat at high-current connections
- Improves safety and long-term system reliability
- Essential for battery and inverter wiring
Hydraulic lug crimpers offer the most consistent results and are ideal for repeat confirmations. Hammer-style crimpers can work for occasional use, but care must be taken to achieve uniform crimps.
This is the lug crimper I used. The key to using this effectively is to use the correct gauge insert to initially tighten the lug. Then downsize the insert one gauge smaller and give a final squeeze until the lug no longer compresses.
Heat Gun

Purpose: A heat gun is used to apply controlled heat to shrink heat-shrink tubing and adhesive-lined electrical terminals.
Why it matters in a van build: Heat-shrink tubing protects electrical connections from vibration, moisture, and corrosion—three constant challenges in a mobile environment. A heat gun provides even, controlled heat, ensuring terminals seal properly without damaging wire insulation or nearby components.
Benefits:
- Creates strong, sealed, vibration-resistant connections
- Activates adhesive-lined heat shrink for moisture protection
- Produces a clean, professional-looking install
- Safer and more consistent than open-flame alternatives
A basic variable-temperature heat gun is more than sufficient for van electrical work. Avoid using lighters or torches, which can scorch insulation and weaken connections.
4. Drilling, Mounting & Physical Installation
Tools for securing components to your van
Electrical systems must survive vibration, temperature changes, and movement.
Drill / Impact Driver

Purpose: A drill or impact driver is used to drill holes and fasten hardware when mounting electrical components, enclosures, and cable management hardware.
Why it matters in a van build: Nearly every part of a van's electrical system needs to be securely mounted to metal or wood surfaces. A drill allows for precise hole placement, while an impact driver makes driving fasteners faster and more consistent, especially in tight or awkward spaces.
Benefits:
- Enables secure mounting of electrical components
- Speeds up installation of panels, brackets, and clamps
- Improves accuracy and repeatability
- Reduces hand fatigue compared to manual tools
A compact cordless drill/driver is ideal for van builds due to tight spaces. An impact driver is helpful but not mandatory if you already own a drill with adequate torque. I like the Home Depot Ridgid-brand set because they have a lifetime warranty.
Step Drill Bits

Purpose: Step drill bits are used to drill clean, progressively sized holes in thin materials such as sheet metal and plastic.
Why it matters in a van build: Van electrical installs often require drilling precise holes for cable pass-throughs, glands, switches, and mounting hardware. Step bits reduce tearing, grabbing, and sharp edges, making them ideal for working with thin van body panels.
Benefits:
- Creates clean, round holes in thin metal
- Allows precise hole sizing without changing bits
- Reduces burrs and sharp edges
- Lowers the risk of panel distortion or damage
A single quality step bit covering common sizes is usually sufficient for a van build. Look for bits rated for metal and use cutting oil to extend bit life and improve cut quality.
Ratchet Set

Purpose: A ratchet set is used to tighten and loosen nuts and bolts when installing electrical components, battery terminals, bus bars, and mounting hardware.
Why it matters in a van build: Many electrical connections and mounting points in a van use bolted hardware rather than screws. A ratchet set allows you to apply controlled torque in tight spaces, ensuring connections are secure without over-tightening, which can damage components or strip threads.
Benefits:
- Provides precise control when tightening hardware
- Makes work in confined spaces faster and easier
- Helps ensure secure, vibration-resistant mounting
- Essential for battery, inverter, and bus bar installations
A compact metric ratchet set covers most van hardware. Shallow sockets handle the majority of tasks, while deep sockets are useful for battery terminals and threaded studs.
5. Labeling, Organization & Clean Install Tools
Tools that make future troubleshooting easy
Often overlooked — and often regretted if skipped.
Label Maker

Purpose: A label maker is used to clearly label wires, circuits, fuse blocks, and electrical components.
Why it matters in a van build: A van electrical system may be simple on day one, but it becomes far easier to troubleshoot, expand, or repair when everything is clearly labeled. Proper labeling eliminates guesswork, reduces mistakes, and saves significant time during future maintenance or upgrades.
Benefits:
- Makes circuits easy to identify at a glance
- Simplifies troubleshooting and future modifications
- Reduces the risk of wiring errors
- Creates a clean, professional-looking electrical system
A basic label maker with durable tape is all you need. Choose labels that resist heat and moisture, and label both ends of every wire for long-term clarity.
Cable Management

Purpose: Cable management supplies are used to organize, secure, and protect electrical wiring throughout your van.
Why it matters in a van build: Vans experience constant vibration, movement, and temperature changes. Properly managed cables reduce strain on connections, prevent chafing against sharp edges, and make the electrical system easier to inspect and service over time.
Common items include:- Zip ties and flush cutters - Cable clamps and mounts - Split loom or conduit - Grommets for pass-throughs
Benefit:
- Protects wiring from abrasion and damage
- Reduces noise and vibration-related wear
- Improves airflow and accessibility
- Creates a cleaner, more professional install
Use cable clamps for permanent runs and reserve zip ties for light-duty bundling. Choose abrasion-resistant loom in areas where wiring passes through metal or high-movement zones.
6. Safety Equipment
Tools that protect you and your van
Safety Glasses, Insulated Gloves, and Fire Extinguisher
Purpose: These safety tools protect you from physical injury, electrical shock, and fire hazards while installing and maintaining your van's electrical system.
Why it matters in a van build: Electrical work in a confined metal vehicle introduces real risks—from flying metal shavings while drilling, to accidental contact with live circuits, to the possibility of electrical fires. Proper safety equipment reduces these risks and should be considered essential, not optional.
- Safety Glasses: Protect eyes from metal shavings, wire strands, and debris while drilling or cutting
- Insulated Gloves: Reduce the risk of shock when working near live circuits or battery connections
- Fire Extinguisher: Provides immediate response to electrical fires, helping prevent damage or injury
Choose safety glasses rated for impact resistance, insulated gloves appropriate for low-voltage electrical work, and an ABC- or electrical-rated fire extinguisher mounted in an easily accessible location.
Conclusion
Building your own camper van electrical system doesn't require a professional electrician's toolbox, but it does require the right tools to get power where you need it. When chosen thoughtfully, a small set of quality tools can carry you through planning, installation, testing, and long-term maintenance of your van's electrical system.
More importantly, the right tools allow you to work safely, confidently, and methodically. They prevent common wiring mistakes and help ensure your electrical system remains reliable long after your build is complete. Many of these electrical tools can go into your toolbox right alongside your other tools. They will continue to serve you well for future upgrades, troubleshooting, and even home projects beyond van life.